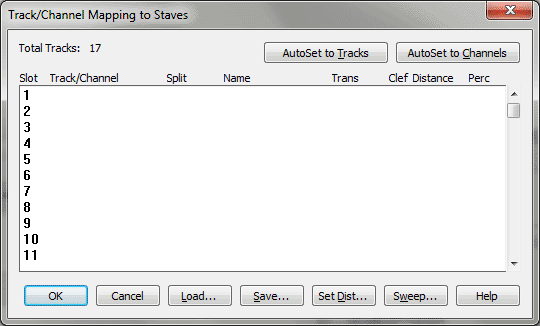
Track/Channel Mapping to Staves dialog box

How to get there
- Choose File > Open and select
MIDI File from the File Type drop-down list.
- Double-click the name of
a
you want transcribed.
- In the Import MIDI File Options dialog box, click
the Set Track-to-Staff List radio button.
- If you have already selected
Set Track-to-Staff List and Don’t show this during File Open, Finale will
display the Track/Channel Mapping to Staves dialog box without first going
through the Import MIDI File Options dialog box.
What it does
The easiest way to translate the "tracks"
from your MIDI sequencer file into notated Finale staves is to leave the
default option, Tracks Become Staves, selected. When you do, each track
from your sequencer file is transcribed onto its own staff in Finale.
If you want more flexibility, however,
you can display this dialog box, in which you can specify a number of
track, MIDI channel, and staff configurations. You can specify the top-to-bottom
order of the resulting Finale staves, as well as staff transpositions,
clefs, and the distance between staves in the resultant Finale document.
- AutoSet
to Tracks • AutoSet to Channels. Click these buttons to create
a Finale staff for each sequencer track or MIDI channel, respectively.
You’ll notice that these are exactly the same as the Tracks Become Staves
and Channels Become Staves options in the previous (Import MIDI File Options)
dialog box. The difference is that after clicking one of these buttons,
you can then modify the assignments that appear in this dialog box. For
example, you can set the staves’ clefs, transpositions, names, and so
on—options that aren’t available when you click the Tracks Become Staves
or Channels Become Staves buttons.
- Track/Channel
• Split • Name • Trans • Clef • Distance • Perc. The largest part
of this dialog box is devoted to this display, which is a scrolling list
of the 128 possible staves you can create in any Finale document. In the
Track/Channel column, you see the name of each track and the MIDI channel
to which it was assigned in the original sequencer file. In the Split
column, Finale displays the split option, if you’ve specified one (for
example, you might want the track split into two staves—for a piano part,
for example). The Name column displays the staff name; Trans is the transposition,
if any (for a transposing instrument such as a trumpet or clarinet); Clef
indicates the clef, by number (0 through 15); and Distance indicates the
distance between the top line of the staff and the top line of the one
above it. The Perc column indicates which Percussion Layout will be used
to adjust the display of percussion noteheads and placement.
Each row of information represents one Finale
staff. To specify all of the variables mentioned above, click anywhere
in a row (but define the rows from top to bottom). The Track/Channel Mapping
dialog box appears, where you can split the sequencer track you clicked
into as many as eight Finale staves. You can base this split on MIDI channel,
the range of notes (like the Split Point and Hand Width options in the
Transcription Mode, or the top-to-bottom order of notes in each chord
(like the Explode Music command in the Utilities menu). See Track/Channel
Mapping dialog box for more information.
- Load
• Save. Once you’ve created a mapping setup, you needn’t re-create
it the next time you want to transcribe a similarly configured MIDI file.
Instead, after creating the mapping by working through this dialog box,
click Save; Finale asks you to title this "TrackMap file." Later,
if you want to transcribe the same MIDI file—or a similarly configured
one—click Load. Double-click the TrackMap File’s title in the list box
that appears; the Track/Channel Mapping dialog box fills itself out automatically.
- Set
Dist. Click this button to display the Set Distances dialog box,
in which you can specify a uniform distance between staves in the resultant
Finale document, as well as the distance between the top staff and the
top page margin. See Set Distances dialog box
for details.
- Sweep.
This button lets you find out which MIDI channels were assigned to a given
track. Click the button; the Sweep For Channels
Present In A Track dialog box appears. In the text box, enter the
number of the track you want scanned, then click Sweep. In the display,
Finale places an X below each MIDI channel number on which you recorded
data in this track. Finale displays this information for each of four
data types; see Sweep For Channels dialog box.
- OK
• Cancel. Click OK to confirm your track-to-staff mapping and return
to the Import MIDI File Options dialog box. Click Cancel to return to
the Import MIDI File Options dialog box without changing the track-to-staff
mapping.
See Also:
Track/Channel Mapping
Import MIDI File
Options

