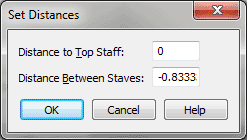
Set Distances dialog box

How to get there
- Choose File > Open and Select MIDI from the File Type drop-down list.
- Double-click the name
of a
you want transcribed.
- In the Import MIDI File Options dialog box, click
the Set Track-to-Staff List radio button.
- Define track-to-staff mappings
for the desired tracks by clicking each row of information (see Track/Channel
Mapping dialog box).
- Click Set Dist.
What it does
In this dialog box, you can specify a uniform
distance between staves in the Finale document that results from your
MIDI file transcription, as well as the distance between the top staff
and the top page margin. Note that you can override these settings on
a staff-by-staff basis by clicking the staff name and changing the Distance
number in the Track/Channel Mapping dialog
box.
- Distance
to Top Staff. The number in this text box specifies the distance
between the top line of the first staff and the top of the window in Scroll
View (the default is –.28 inches, because it’s being measured down from
the top of the window). You can think of this distance as the distance
between systems.
- Distance
Between Staves. The number in this text box specifies the distance
from the top line of one staff to the top line of the next. The default
is –.83 inches, because each successive staff is placed below the previous
one in the system.
- OK
• Cancel. Click OK to confirm your staff placement settings and
return to the Track/Channel Mapping to Staves dialog box. Your distance
settings will be reflected in the Distances column. Click Cancel to return
to the Track/Channel Mapping to Staves dialog box without specifying a
uniform distance between staves and systems.
See Also:
Track/Channel Mapping
Import
MIDI File Options

