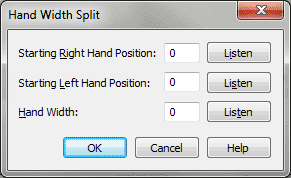
Hand Width Split dialog box

How to get there
- Choose File > Open, and select
MIDI File from the File Type drop-down list.
- Double-click the name of
a
you want transcribed.
- In the Import MIDI File Options dialog box, click
Set Track-to-Staff List.
- In the Track/Channel Mapping for Staves dialog
box, click the first row of information you haven’t yet filled in.
- Click
Hand Width.
What it does
This dialog box lets you transcribe the
contents of the sequencer
you’ve specified into two staves, splitting the notes according to the
width of your hands, based on the numbers you enter in this dialog box.
The advantage of this method of splitting your performance into right-
and left-hand parts (as compared with the Fixed split point option) is
that Finale follows your hands as they move up and down the keyboard,
eliminating the need to specify a single, fixed split point—provided there’s
always a large enough gap between the hands for Finale to know which hand
is which.
- Starting
Right Hand Position • Starting Left Hand Position • Listen. These
text boxes let you tell Finale where your right and left hands are at
the beginning of the track(s) to be transcribed. The numbers are synthesizer
key numbers (middle C is key number 60), and they specify the starting
position of your leftmost finger of each hand.
Instead of calculating key numbers and entering
them in these boxes, just click the Listen button, then play the note
or chord that begins the left-hand (or right-hand) part of the track you’re
transcribing. Finale automatically enters the key number into the appropriate
text box (in which you’ve clicked the cursor).
- Hand
Width: • Listen. In this text box, enter the widest interval, in
half steps, that either hand played during your performance. Instead of
calculating the number of half steps, click Listen to MIDI, and play the
widest interval. The checkbox is no longer selected, and the Hand Width
text box displays the width of the interval.
- OK
• Cancel. Click OK to confirm, or Cancel to discard, the hand width
settings you’ve just made. You return to the Track/Channel Mapping dialog box.
See Also:
MIDI
Track/Channel Mapping
Track/Channel Mapping
to Staves
Import MIDI File
Options
File
menu

