|
L'aide française est disponible au format PDF en cliquant ici (ou dans le Menu "Démarrer", Finale 2010, Documentation PDF française)
Le tutoriel français est disponible au format PDF en cliquant ici.
La mise à jour de l'aide française au format HTML sera disponible prochainement.
|
Traduction française :

|
Expressions: Creating your own expressions 

Let’s suppose that the Trombone 1 is sometimes playing with a mute (con sordino) and other times without a mute (senza sordino). You won’t find these terms in the standard Finale expressions libraries, so you’ll need to create them yourself.
- Click the Expression Tool
 and double-click on the dotted quarter note in measure 1 (of the Trombone 2 staff). The Expression Selection dialog box appears. The expressions we will add tell the performer when to use a mute, so it would be in the “Technique Text” category.
- Click the Technique Text category. Finale displays the technique text expressions in the preview window. You’ll find that the Text Expressions you’re seeking, con sordino and senza sordino, don’t appear in this list, so we will create them.
You’ll find that the Text Expressions you’re seeking, con sordino and senza sordino, don’t appear in this list. Here’s how to create them.
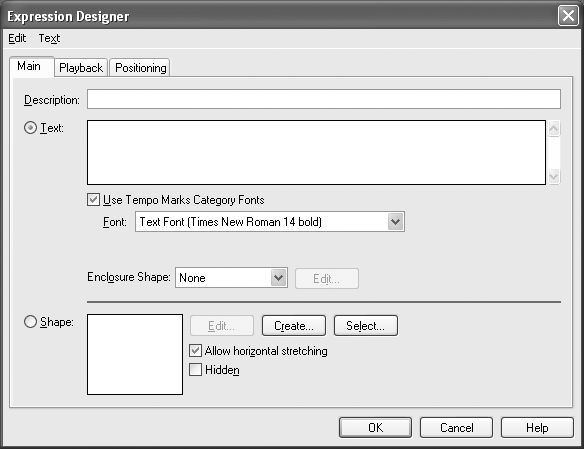
- Click Create. The Text Expression Designer dialog box appears.

- Type the words “con sordino.”
To use an independent font instead of the category’s, uncheck Use Category Fonts under the Main tab. To use an independent positioning instead of the category’s, uncheck Use Category Positioning under the Positioning tab.
- Click OK. Con sordino has been added to the list of expressions, and assigned to the Technique Text category. You won’t have to create it again the next time you need it in this score.
- Click Select. You return to the score, you’ll see that the con sordino marking appears above the staff.
- Scroll to measure 10 and double-click above the first note of the Trombone 2 part. Create the senza sordino expression the same way you created the con sordino marking and drag the marking into place.
Let’s suppose you want the musicians to play faster at the chorus or “Vivace.” You won’t find this term in the standard Finale expression sets, so you’ll need to create it yourself.
- Click the Expression Tool
 and double-click below measure 10 (of any staff). The Expression Selection dialog box appears.
- Click the Tempo Marks category and then click Create. The Text Expression Designer dialog box appears.
- Type the word “Vivace.” Next we’ll add a Tempo playback effect to the marking.
- Click Playback tab. The Playback/Record Options appear.
- From the Type menu, choose Tempo. The duration menu appears to the right. It’s already set to a quarter note, so we’ll leave it alone.
- Click in the Set to Value box and type 200. Note that if your expression includes a metronome marking (e.g. Œ = 88), Finale automatically assigns the playback tempo accordingly when “Match playback to metronome marking text” is checked in the Expression Designer dialog box.
- Click OK; click Assign. Notice that “Vivace” has been added to the list of expressions. You won’t have to create it again the next time you need it.
When you return to the score, you’ll see that the marking appears above the Trombone 1 staff. Tempo Marks are defined to always appear above the top staff (in the Score List section of the Category Designer dialog box). This marking will also appear at measure 10 in each individual part.
- Press Ctrl-Alt-> (Mac users, Command-Option->). The Trombone 1 part appears. Notice the “Vivace” marking appears above measure 10.
- Press Ctrl-Alt-< (Mac users, Command-Option-<) to return to the full score.
Feel free to adjust its positioning by dragging its small square handle. While dragging markings is good for general repositioning, you may sometimes need to make finer position adjustments—with the arrow keys, (or “nudge” keys).
 Previous Previous
|
Next  |


