|
L'aide française est disponible au format PDF en cliquant ici (ou dans le Menu "Démarrer", Finale 2010, Documentation PDF française)
Le tutoriel français est disponible au format PDF en cliquant ici.
La mise à jour de l'aide française au format HTML sera disponible prochainement.
|
Traduction française :

|
Basic articulations and expressions 

We’ll start with an introduction to articulations (staccatos, accents, fermatas) and dynamic expressions (Moderato, F , solof, etc.).
- Click the Articulation Tool
 . Using this tool, you can click on, above, or below a note—it doesn’t matter. Finale’s articulations are smart; they jump into place, centered on the notehead, automatically.
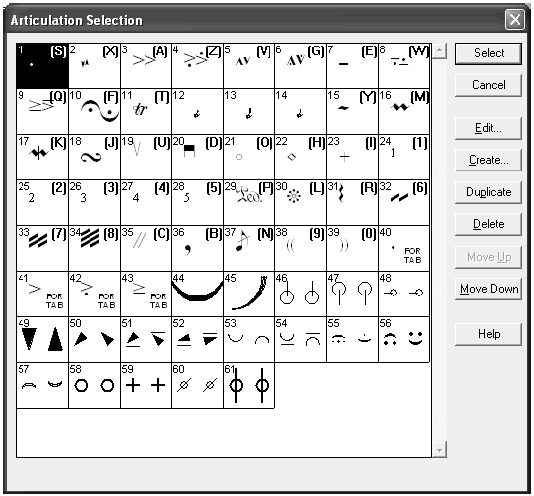
- Click the dotted quarter note in the Trombone 2 staff in measure 3. The Articulation Selection dialog box appears.

You must be in the same layer as your notes to attach anything to them, such as lyrics, articulations, expressions, or chord symbols.
Incidentally, some symbols, such as <, have been defined to flip upside-down automatically when a note’s stem direction changes (as a result of a transposition, for example). Articulations with an associated upside-down symbol appear above one another in their selection square.
- Double-click the accent mark (top row, third from left). Double-clicking an Articulation in this dialog box is the same as clicking once then clicking Select.
When you return to the score, you can see that Finale not only centered the accent on the notehead, but it also knew which side of the note (top or bottom) to use. You can override Finale’s placement decision, of course—to move the mark, drag its handle. (You can also delete a mark by clicking its handle and pressing Delete.)
So that you understand what’s happening behind the scenes, try this experiment:
- Click the Simple Entry Tool
 . Windows users
  -click, Mac users
  -click squarely on the notehead of the dotted quarter note; press the down arrow three times until the stem direction changes. Finale doesn’t simply flip the stem—it also relocates the accent mark to the other side of the note. Press the up arrow three times to move it back into place.
Now let’s add a couple dynamic markings.
- Click the Expression Tool
 . Expressions are attached either to the measure you double-click or to a specific note in that measure. For the moment, let’s put in a mezzo forte marking.
To add an expression while entering with the caret in Simple Entry, press the X key.
- Double-click where you want the marking to appear. The Expression Selection dialog box appears. (If you’re ever trying to put in an Expression and this window comes up empty, it’s because no libraries were loaded into the document. We’ll cover libraries in more detail later in this tutorial.)
Note the categories on the left side of this dialog box (“Dynamics,” “Tempo Marks,” Etc.). Each of these categories include markings similar in appearance and positioning. Settings for a category can be changed, altering the appearance and/or positioning of all expressions in that category. You will learn more about editing categories soon.

- Double-click on
 . Finale places the marking in the score based on the category’s positioning settings. By default, expressions in the Dynamics category are defined to appear beneath the staff.
You can change the positioning settings of expressions by clicking the Edit Categories button in the Expression Selection dialog box to open the Category Designer. For example, if you are notating a choral score, you will want Finale to automatically place the dynamic markings above the staff. To make this change, you would click Edit Categories and then change the Vertical Alignment setting to “Above Staff Baseline or Entry.” See Category Designer dialog box in the User Manual for more details.
Use the Assign button and adjacent drop-down menu to assign dynamics, expressive text, and technique text to multiple staves. To define a list of staves, choose Assign to Staves. The Assign to Staves dialog box opens where you can select specific staves for expression entry.
Tempo marks, tempo alterations, and rehearsal marks apply to all staves of the score, but are shown on a select few as defined by the expression's . The Score List is part of the category definition and can be edited in the Category designer dialog box.
 Previous Previous
|
Next  |


 -click, Mac users
  -click squarely on the notehead of the dotted quarter note; press the down arrow three times until the stem direction changes.

 .
.