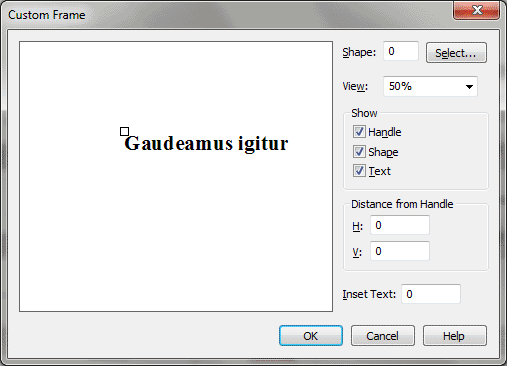
Custom Frame dialog box

How to get there
- Click the Text tool
 . The Text menu appears.
- Click a text block .
- Choose Text > Custom Frame.
What it does
The Custom Frame dialog box contains an
option where you specify the amount to inset a text block from the custom
shape.
- Shape
• Select. The number in the Shape text box identifies the enclosure
shape by number. To select one visually—or to create a new one—click Select.
The Shape Select dialog box will appear; if you’ve loaded a Shape Library
into your piece, such as the one provided with Finale, the shapes will
appear in this selection dialog box. Either double-click on to select
it, or click Create to enter the Shape Designer, where you can create
your own (see Shape Designer dialog box). In
either case, when you return to the Custom Frame dialog box, Finale places
the correct shape number in the text box.
- View.
You can magnify or reduce the view custom frame as you’re working on it
by choosing a magnification level from this drop-down list. (100% is actual size.) Use
it if you want to "zoom in" on a very small custom frame, or
"zoom out" to see all of a very large custom frame; neither
has any effect on the size of the custom frame as it will appear in the
score.
- Show:
Handle • Shape • Text. These checkboxes govern what elements of
your custom frame appear in the dialog box. (A selected checkbox means
that the object will appear.)
- Distance
from Handle. These are two small circular handles in the a Custom
Frame dialog box display; a black one and white one (but they’re initially
superimposed, so that all you can see is the white one). The white circle
represents the location of the custom frame’s handle when it appears in
the score.
If you want to position the black dot relative
to the white dot numerically, you can enter measurement values in the
two text boxes. The H: text box sets the horizontal distance from the
black dot to the white dot. (a positive number moves the white dot to
the right, a negative number moves it to the left); the V: text box sets
the vertical distance (a positive number moves the white dot upward, a
negative number moves it downward). After entering numbers into these
text boxes, drag anywhere in the display area to update the screen image.
- Inset
Text. Enter the distance, in measurement units, that you want to
inset the text block from the shape. Finale always uses this value, even
if the frame is hidden.
Although you can edit the text flowing into
custom frames on the screen, custom frames cannot be resized on the screen,
nor can they be set to expand automatically to accommodate more text.
To take advantage of on-score resizing and expanding, see Standard
Frame dialog box.
Note: If you create a custom shape, Finale
will display the text in a standard editing frame while you’re editing
it on-screen. When you’ve finished editing, the text will be shown on-screen,
within or surrounding the custom shape you selected.
- OK
• Cancel. Click OK to confirm the construction of your custom frame
and return to the score. Click Cancel if you decide note to create or
edit a custom frame.
See Also:
Text menu
Text tool

