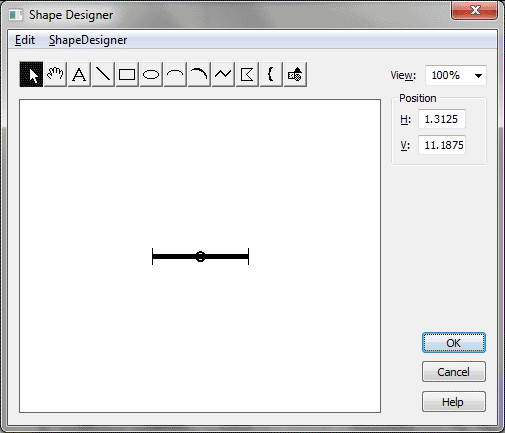
Shape Designer dialog box

How to get there
- Click the Expression tool
 , and double-click a note or measure.
- Click Create New in any category.
- Select Shape and click Create (or,
to edit an existing Shape Expression, click it and then click Edit, then
Edit again).
You can also enter the Shape Designer dialog
box when you’re choosing:
- a multimeasure rest
- a custom stem shape (Special
Tools Tool)
- a Custom Frame for the Text tool
- an Executable Shape as
part of the playback definition for an expression
- custom barline
- custom
arrowheads for Smart Shapes
- articulation shapes
What it does
The Shape Designer is Finale’s built-in
graphics designer. You might create, for example, a harp pedaling diagram,
or a custom barline. You can also design rectangles to use as frames when
you’re creating ,
block rests to serve as multimeasure rests in extracted parts, and special
shapes for use as custom stems.
There are a number of drawing tools at
the top of the screen; to create a shape, you click the tool you want
to use, then click or drag in the blank display area. Each time you do
so, you create a separate, movable, resizable, reshapable object. Objects
may be grouped together, sent behind or in front of other objects, copied
or pasted.
Using the Shape Designer menu, you can
display a background grid, change the shading and line thickness of objects,
and specify Font for text objects; see Shape
Designer menu.
To reshape an object, click it using the
Selection tool, so that its handles appear. Drag these handles to resize
the object—or, if it’s a curve, slur, bracket, multiline or polygon shape,
double-click to reveal a number of individually-adjustable control point
handles. For more precision, you can also select a single control point
handle and reposition it by typing numbers into the H: and V: boxes. These
numbers are like plane geometry coordinates (horizontal and vertical,
respectively). (After entering a number, press tab to see the change reflected
in the display.)
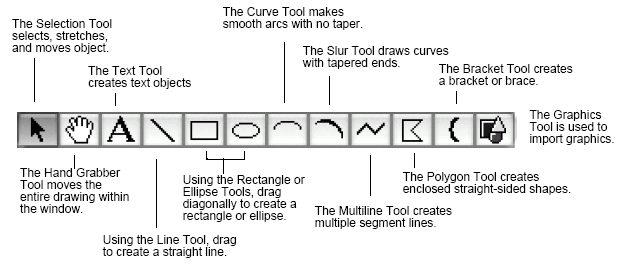
At the top of the window are the drawing
tools. Here’s a summary:

- Selection
Tool. Use this tool for selecting, re-shaping, and moving objects.
Click an existing object to make its handles appear; SHIFT-click to select
multiple objects. Drag a handle to re-shape the object, drag the object
to move it, or press DELETE to remove it. Double-click a polygon, multiline
shape, curve, or bracket to display its control handles.
- Hand
Grabber Tool. This tool works just like the Hand Grabber Tool in
Finale’s main tool palette; it lets you adjust the drawing’s position
in the window. Drag in the drawing area to shift the entire drawing in
any direction.
- Text
Tool. Use this tool to create and edit text blocks, or text objects.
Click in the drawing area, and then type. You change the Font using the
Select Font command in the Shape Designer menu—either by first clicking
in the text block just before the text you want to change, or by first
selecting the entire text block with the Selection tool. Click an existing
text block to position it. Click the mouse to exit the text block. Text
doesn’t wrap automatically within a text object; as you type, therefore,
you need to press enter to create a new line within a text block.
- Line
Tool. Use this tool to draw single straight lines, anchored at
the point of your first click, by dragging in the drawing area. Describe
the line’s thickness, shading, and dashed quality using the Shape Designer
menu, before creating it or when it’s selected. Press shift while dragging
to create a perfect horizontal, vertical, or 45-degree line.
- Rectangle
Tool. To draw a square or rectangle anchored at the point of your
first click, drag diagonally in the drawing area. Press shift while dragging
to create a perfect square. Describe the rectangle’s thickness, shading,
and dashed quality using the Shape Designer menu, before creating it or
when it’s selected.
- Ellipse
Tool. Drag diagonally in the drawing area to draw an oval, anchored
at the point of your first click. Press shift while dragging to create
a perfect circle. Describe its thickness, and shading using the Shape
Designer menu, before creating it or when it’s selected.
- Curve
Tool. Drag in a straight line to create a shallow Bézier, non-tapered
(reshapable) curve, anchored at the point of your first click, that bows
away from the imaginary line. You determine the direction of the arc by
the direction you drag: drag to the right to produce an upward arc, drag
upward to produce a leftward arc, and so on. Describe the curve’s thickness
and dashed quality using the Shape Designer menu, before creating it or
when it’s selected. Using the Selection tool, click a curve to see its
bounding handles, which you can drag to resize the curve; double-click
a bounding handle to display its control points, which you can use to
reshape the arc.
- Slur
Tool. Drag in a straight line to create a shallow solid or dashed
Bézier (reshapable) tapered slur, anchored at the point of your first
click. As with the Curve Tool, you determine the direction of the arc
by the direction you drag: drag to the right to produce an upward arc,
drag upward to produce a leftward arc, and so on. The Shape Designer menu’s
line settings don’t affect a slur. Using the Selection tool, click a slur
to see its bounding handles, which you can drag to resize the curve; drag-select a bounding handle (by, for example, clicking to the upper left of the slur and dragging to the lower right) to display its control points, which you can use to
reshape the arc.
- Multiline
Tool. This tool creates shapes with more than one line segment.
Drag to create the first line segment, and then click to specify each
additional point (an additional line segment is drawn with each click).
Describe the shape’s thickness and dashed quality using the Shape Designer
menu, before creating it or when it’s selected. Using the Selection tool,
click a multiline shape to see its bounding handles, which you can drag
to resize the object; double-click a bounding handle to display its control
points, which you can use to reshape the individual segments.
- Polygon
Tool. This tool lets you create fully-enclosed shapes composed
of multiple line segments. Drag to create the first line segment, and
then click to specify the next point. An additional line segment is drawn
with each additional click. Double-click to close the shape (by drawing
a final line back to the starting point). Describe the shape’s thickness,
shading, and dashed quality using the Shape Designer menu, before creating
it or when it’s selected. Using the Selection tool, click a polygon to
see its bounding handles, which you can drag to resize the object; double-click
a bounding handle to display its control points, which you can use to
reshape the sides of the shape.
- Bracket
Tool. Select a bracket style by choosing Bracket Style from the
Shape Designer menu. To draw the bracket, click once in the drawing area;
a full-fledged bracket appears. To resize it, click the Selection tool;
click the bracket and drag one of its bounding handles. Drag-select (by, for example, clicking to the upper left of the bracket and dragging to the lower right) to display its control point handles, which you can drag to reshape a
curly piano brace.
- Graphics
Tool. This tool allows you to place and export graphics using Finale’s
Graphics tool. (See Graphics tool.)
- View.
This drop-down
list lets you select a percentage of actual size at which you want your
shape displayed. Use it if you want to "zoom in" on a very small
shape, or "zoom out" to see all of a very large shape. You can
also specify a degree of magnification not listed in the drop-down list by typing a number directly
into the text box. Press tab after typing the number in the text box to
display the change immediately.
- Positioning:
H: • V:. These text boxes display the horizontal and vertical coordinates,
respectively, of your cursor as you move it around the screen. If you
click a handle of an object, these boxes show the handle’s coordinates—which
you can edit, and then when you press enter, tab, or click outside the
number box, the handle will jump to the new coordinates. A positive number
in the H: box indicates a position to the right of the origin (the small
white circle that anchors your shape), and a negative number indicates
a position to the left. A positive number in the V: box indicates a position
above the origin, and a negative number indicates a position below it.
- OK
• Cancel. When you’re finished creating the shape, click OK to
return to the previous dialog box; your shape is now ready for use. Click
Cancel to return to the previous dialog box without creating or editing
a shape.
See Also:
Shape Selection
Expression Designer


