|
L'aide française est disponible au format PDF en cliquant ici (ou dans le Menu "Démarrer", Finale 2010, Documentation PDF française)
Le tutoriel français est disponible au format PDF en cliquant ici.
La mise à jour de l'aide française au format HTML sera disponible prochainement.
|
Traduction française :

|
The Resize Tool 

You’ve already experimented with the Zoom command in the View menu. This command—and the options on its submenu—allow you to “zoom in” to and “zoom out” from your document, magnifying or reducing your view of it. During the entire process, however, the actual size of the music—the printed image—remains precisely the same.
The Resize Tool, however, can resize the music itself.
For this example, use the document called “Tutorial 4” that you’ve been working on to this point and scroll to page 1.
- Click the Resize Tool
 . The amount of music to be resized depends on where you click on the screen.
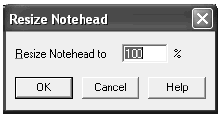
- Click a notehead. The Resize Notehead dialog box appears. The limits of the Resize Tool are 10% to 999%.

- Type 200 and click OK. You’ve just doubled the size of the notehead (or made it 200% of its original size). To restore it, you must click precisely at the spot where the normal size notehead was. The Resize Notehead dialog box reappears; type 100 and click OK. (Or, select Undo from the Edit menu.)
The reduction and enlargement effects of this tool are not cumulative. If you make a note half its size (50%) and then decide to reduce it again by half, you would type 25% in the Resize Notehead dialog box the second time, not 50%.
- Scroll to measure 5. Click the stem of the top eighth note in the top staff. The Resize Note dialog box appears, but this time you’re resizing the entire note group—in other words, a chord or a series of beamed notes. When you enlarge or reduce an entry group, any lyric or dynamic attached to it also grows or shrinks.
- Type 50 and click OK. You’ve just created cue notes.
These are the only two powers of the Resize Tool in Scroll View.
- Press the Home key. Or, scroll to the top left of the page.
- Click to the left of the top staff. The Resize Staff dialog box appears, this time asking how much to resize the staff
- Type 80 and click OK. You’ve just created a cue (or rehearsal) staff at 80% of the normal staff size.
- Click between the two staves to the left of a system. When the Resize Staff System dialog box appears this time, there are two additional options—Hold Margins and Resize Vertical Space.
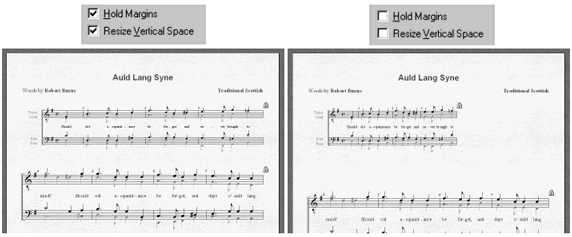
Finale is asking whether or not it should maintain the system margins as it resizes the music. If you don’t select Hold Margins as you reduce the music, for example, the system will shrink in both dimensions, thus reducing its width. If you do select Hold Margins, Finale will hold the system at its current margin-to-margin width but reduce the music in it so that more measures fit on the line.
To resize a system using Resize Staff System, you must have more than one staff; otherwise, use Resize Staff.

Select Hold Margins if you want the systems on the page to maintain their margin-to-margin width (above, left). Otherwise, Finale reduces the music proportionally in both dimensions (right).
Finale also wants to know whether it should maintain the amount of blank space between this system and the next one, or whether you’re reducing that distance as well. Select Resize Vertical Space if you want to tighten up the space between this system and the next.
- For Resize System,Type 75. Select Hold Margins and Resize Vertical Space (if they’re not already selected). Click on System 1 through 1. Click OK. Now, for practice, try removing an enlargement or reduction.
- Click between two staves to the left of the first system. For Resize System, enter 100%, and click OK. The system is back to its original size.
- So far you’ve seen Finale resize a single note, a note group, a single staff, and an entire system. Often, however, you’ll want to reduce all the music at once, so that you can fit the music on fewer pages.
- Click the upper-left corner of the page. The Resize Page dialog box appears.
- Type 75. Click OK.
NOTE: If you use the Resize Tool on a system or a page, as you’ve just done, you change the measure widths. Whenever you perform any operation in Finale that changes the measure widths, you must tell Finale to compensate by rearranging the layout of measures. As noted previously, Finale performs an Automatic Update Layout for you; if you have decided to turn this feature off, you'll need to do it manually now.
- From the Utilities menu, choose Update Layout. Only now does Finale redistribute the measures. If your purpose in reducing the size of the music was to fit more music on fewer pages, you won’t see the results until you choose Update Layout.
 Previous Previous
|
Next  |


