|
L'aide française est disponible au format PDF en cliquant ici (ou dans le Menu "Démarrer", Finale 2010, Documentation PDF française)
Le tutoriel français est disponible au format PDF en cliquant ici.
La mise à jour de l'aide française au format HTML sera disponible prochainement.
|
Traduction française :

|
Working with Inner voices: Layers 

In this example, let’s suppose that you’ve decided to add a few harmony notes.
Finale lets you have up to eight voices—independent lines of music, each with its own stem—per staff. (Within each of the eight voices, a chord can have up to twelve notes—a total of 96 notes per staff on any given beat.) Most of the time, you’ll probably need only two voices, stems up and stems down. You’ll find such music especially easy to notate in Finale, because every staff can have four completely independent layers of music. You can think of them as clear plastic overlays, because each layer is utterly independent—each can even have its own MIDI channel for playback. You can flip easily from one layer to the other, and even hide the ones you’re not working on.
If you do need more voices, you’ll discover that each layer can have two voices of its own, Voice 1 and Voice 2, giving you a total of eight to work with. The Voice 1/Voice 2 mechanism is more complex, however; save it for the times when you need more than four voices per staff.
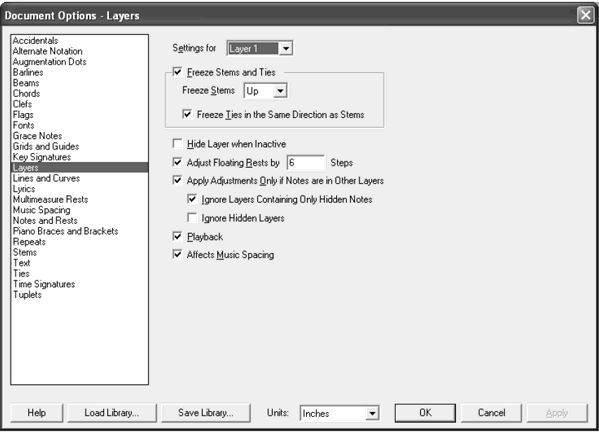
- From the Document menu, choose Document Options, then select Layers. You will see the Layer Options on the right side of the Document Options dialog box. Here is where you control the behavior of each voice.

- For Layer 1, Freeze Stems and Ties should be checked, and Up should be selected from the drop-down list by default. Also, Freeze Ties in the Same Direction as Stems and Apply Adjustment Only if Notes are in Other Layers are checked. Choose Layer 2 from the Settings for drop-down list.
- For Layer 2, select Freeze Stems and Ties, and then choose Down from the drop-down list. Next, select Freeze Ties in the Same Direction as Stems and Apply Adjustments Only if Notes are in Other Layers. Also click Adjust Floating Rests by, and type –6 into the text box. Don’t panic! You’ve simply told Finale that whenever there are two independent voices, Layer 1’s stems should automatically flip up, and Layer 2’s stems should flip down. In such cases, ties should flip the “wrong” way to avoid collisions with the other voice. You’ve also said that when Layer 2 has a rest, it should appear four lines or spaces lower (–6) than its usual position (the middle B line). You’ll see the effects of your settings soon.
- Click OK. Now let’s put in the harmony notes. You want to enter them in Layer 2.
- For Windows, click the Layer 2 push button in the lower left corner of the screen. For Macintosh, choose Layer 2 from the pop-up menu in the lower left corner of the screen. You’ve just made Layer 2 the active layer of every staff.
- Click the Simple Entry Tool
 .
.
- Click the half note icon in the Simple Entry palette (or press 6 on the numeric keypad) to select a half note duration.
- Position your cursor on the A below middle C on the first beat of measure 10 and click. Do the same for the second half note in measure 10. You can see that the stems are properly flipped. (Note you could also enter these notes with the Simple Entry Caret with the same results).
- Press
 -
- -1 (Mac:
  -
- -1) to return to Layer 1. The editing frame now displays Layer 1, and Layer 2 is dimmed.
  -
- -# (1-4) (Mac:
  -
- -# (1-4) is a keyboard shortcut used to change the active layer while entering.
There are two special cases you should be aware of when working with layers. First, there are times, often found in keyboard music, when the second voice doesn’t begin until the middle of a measure (below right). The solution is to fill up the beginning part of the measure with rests (below left):

To create the appearance of a Layer 2 voice that begins in mid-measure (right), first create “placeholder” rests (left). Use the letter h key to hide the rests.
In Simple Entry,  /
/ -click each rest and press the letter h key. The rest dims to indicate it is hidden (and will not print); now it’s merely a placeholder to align the notes of the second voice. (Press the h key again to make the entry reappear.)
The second problem you may encounter is when the notes in each layer are an interval of a second apart, like this:

You need to offset one of them to avoid the collision. One solution is simply to drag either note to one side when you’re editing with the Speedy Entry Tool. (You can drag notes both vertically and horizontally when you’re editing. If you want to make sure you don’t inadvertently move the note sideways when you want to drag it up or down—or vice versa—press the d key as you drag. Finale will constrain the cursor to perfectly horizontal or vertical movements.)
Another solution is to let Finale's Automatic Music Spacing feature work for you. From the Document menu, choose Document Options, then select Music Spacing Options; make sure that Seconds and Unisons are selected in the Avoid Collision Of section of the dialog box. See Music Spacing in the User Manual for more information.
 Previous Previous
|
Next  |


 -
- -1 (Mac:
  -
- -1) to return to Layer 1.
 /
/
