|
L'aide française est disponible au format PDF en cliquant ici (ou dans le Menu "Démarrer", Finale 2010, Documentation PDF française)
Le tutoriel français est disponible au format PDF en cliquant ici.
La mise à jour de l'aide française au format HTML sera disponible prochainement.
|
Traduction française :

|
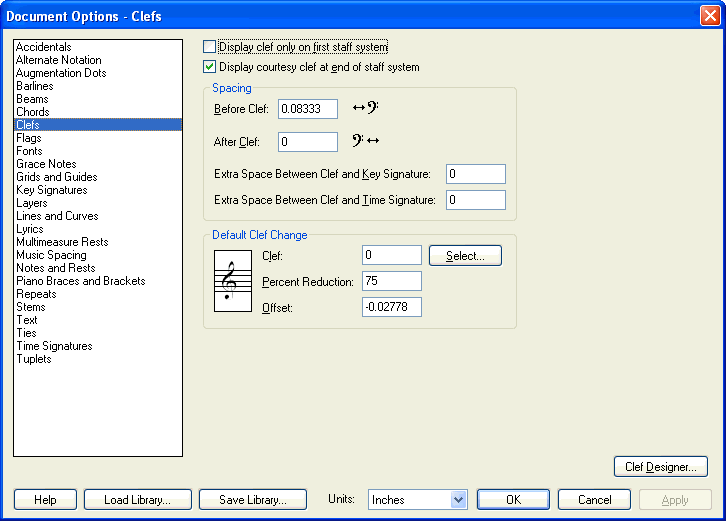
Document Options-Clefs dialog box

How to get there
From the Document menu, choose Document Options and select Clefs.
What it does
Finale treats each clef intelligently, correctly renotating the music that follows it. Use these options to specify when to display clefs, modify clef spacing, configure settings for clef changes, load and save clef libraries, and design your own clefs. Finale supplies you with eighteen standard clefs for use in your pieces.
- Display Clef Only on First Staff System. When selected, Finale displays the clef on the first staff system of each page only. This option is particularly useful for lead sheets.
- Display Courtesy Clef at End of Staff System. If a clef change occurs at the end of a line (system) of music, it’s traditional to forewarn the musician by displaying the incoming clef at the rightmost end of the preceding system. Check this box to display these courtesy clef changes.
- Spacing: Before Clef • After Clef. These numbers determine the amount of space to the left and right of a clef in the score, respectively. The first text box specifies the distance from the left barline to the clef; the second text box specifies the distance from the clef to the key signature.
- Extra Space Between Clef and Key Signature. Here, specify the space between clefs and key signatures. You can use this setting as an alternative to the Before Clef and After Clef setting.
- Extra Space Between Clef and Time Signature. Here, specify the space between clefs and time signatures. You can use this setting as an alternative to the Before Clef and After Clef setting.
- Default Clef Change: Clef; Select • Percent Reduction • Offset. This text box identifies, by number, the default starting clef of a new staff and any floating measures you create with the Ossia Tool. (Finale’s usual default starting clef is the treble clef, number 0.) If you know the number of the clef you want to specify for all new staves, you can enter it in this text box (the available clefs are numbered 0 through 17). You may find it easier, however, to click Select; Finale displays a palette of all eighteen available clefs. Double-click the clef you want; Finale enters its number in this text box automatically.
The number in the Percent Reduction text box specifies the default size of an inserted clef (one that appears in mid-staff), expressed as a percentage of full size. The default value is 75%. (You can override this default reduction on a case-by-case basis. See Clef Tool.)
The number in the Offset text box sets the distance between an inserted clef and the barline it precedes:

This offset applies only to “single” Finale clefs—those that appear just before the left barline of the measure they’re to modify. (Contrast with mid-measure clefs, which can appear anywhere in a measure.) The default value is –.028 inches (a negative number, because it’s being measured leftward from the barline).
- Clef Designer. Click the Clef Designer button to display the Clef Designer dialog box, where you can replace or edit any of the clefs—including their appearance, placement, and effect on the music.
See Also:
Clefs
Clef Tool
Clef Designer
Document menu/Document Options


