If you don’t need pedal markings to appear
in your score, but want to add the use of the sustain pedal to the playback
of your score, you may find the following method faster than the Expression
method.
Human Playback must be set to None to hear
sustain indications added with the MIDI tool. See Playback Settings dialog box for
Details.
- Click the MIDI tool
 . The MIDI tool
menu appears.
. The MIDI tool
menu appears.
- Double-click the measure in which you want
the pedal to be “pressed.” The MIDI tool split-window
opens.
- Choose MIDI tool > Edit Continuous
Data. The View Continuous Data dialog box appears, in which you
can select a controller whose data you want to edit.
- Click OK (since Sustain Pedal is already selected).
You return to the MIDI tool split-window,
where the display has changed. On the left side you see a scale of controller
values—in this case, sustain pedal values—from 0 (pedal up) to 127 (pedal
down). The sustain pedal is called a noncontinuous controller, because
its value can’t change smoothly over time (like pitch wheel data can).
You’ve either pressed the pedal (value 127) or released it (value 0).
Unless you’ve already created pedaling using the MIDI tool (or by capturing
a Transcription Mode performance that included use of the sustain pedal),
the window is empty.
Pedaling will appear in this window in
bar graph form. In the example below, the pedal was
depressed just after the second beat of measure 1, and released just after
the fourth beat:
Controller information is independent of
the actual notes being played—you can press the pedal even during a measure
of rests, if you want. Therefore, you specify where you want to insert
a “pedal down” message (or another noncontinuous controller, or a patch
change) by dragging through a sliver of the graph area.
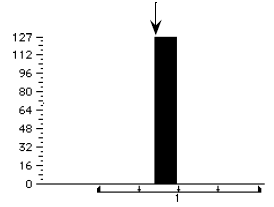
- Drag through a small horizontal “slice” at
the beginning of the graph area, as shown. Keep in mind that the
actual pedal usage will occur at the beginning of the region you select
(indicated by the arrow in the figure below). It really doesn’t matter,
therefore, how much of the window you highlight; the pedaling message
will be inserted at the far left edge of your highlighted region.
- Choose MIDI tool > Set To.
The Set To dialog box appears. Remember that to create the “pedal down”
message, you need to set the pedal’s MIDI value to 127.
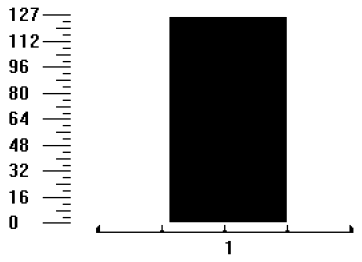
- Type 127. Click OK. You return to the
MIDI window. Suddenly the entire graph area is black. That’s because you’ve
just inserted a “pedal down” message without any corresponding “pedal
up” message. Therefore, your synthesizer will think that the pedal is
being pressed during the entire piece.
- Drag through a small region of the graph area
at the point where you want the pedal released. If the pedal release
point isn’t in the same measure, click the right arrow button to scroll
the music display. Remember that the “pedal up” message will fall at the
beginning of your selected region.
- Choose MIDI tool > Set To. Click
OK. You don’t have to enter a number, because the default value
is already zero. When you return to the window, click anywhere except
in the graph area to remove the selection highlighting.
- Click the MIDI tool to close
the MIDI tool split-window. Once you’ve created one complete usage
of the pedal, as you’ve just done, you don’t have to create it again in
other measures that should contain a similar pedaling pattern. You can
simply copy the pedaling from measure 1 into other measures. See To copy or erase
captured (or edited) MIDI data.
