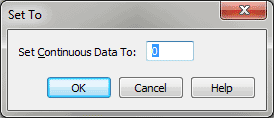
Set To - Continuous Data dialog box

How to get there
- Choose
Window > Advanced Tools. Click the MIDI tool
 . The MIDI menu appears.
- Select some measures. If you’re in the MIDI tool split-window,
select the region you want to affect by dragging through the "graph"
display area or by selecting the handles of individual notes whose MIDI
data you want to edit.
- Choose MIDI tool > .
- Choose MIDI tool > Set To.
What it does
This dialog box’s function is to allow
you to set the values of the selected MIDI data type to a specified value.
- Set
Continuous Data to ____. In the text box, enter the value to which
you want to set the continuous data within the selected region. The number
you enter in the text box pertains to the controller you’ve specified
(on a scale from 0 to 127). For example, the sustain pedal (controller
64) only has two possible values: 127 (pedal down) and zero (pedal up).
Therefore, to insert a "pedal down" message, click in the "graph
area" of the MIDI tool split-window
at the location where you want it to occur and drag to the right. (It
doesn’t matter whether you select a large region by dragging or only a
tiny vertical sliver—all Finale needs to know is where the beginning of
the selection falls, because that’s where it will insert the "pedal
down" message.) Choose Set To from the MIDI tool menu, and enter
the 127 in the text box. (Be sure to use the Set To command again later
in the passage to set the sustain pedal’s value to zero, or Finale will
play back your piece as though the sustain pedal was never released.)
- OK
• Cancel. Click OK to confirm, or Cancel to discard, the MIDI data
changes you’ve specified. You return to the MIDI tool split-window
(or the score).
See Also:
MIDI
Tool menu
MIDI tool

