|
L'aide française est disponible au format PDF en cliquant ici (ou dans le Menu "Démarrer", Finale 2010, Documentation PDF française)
Le tutoriel français est disponible au format PDF en cliquant ici.
La mise à jour de l'aide française au format HTML sera disponible prochainement.
|
Traduction française :

|
The Special Tools Tool: Fancy beaming and stemming 

The Special Tools Tool provides you with fine-tuning control over spacing, beaming, ties, dots, and stems.
- Open the tutorial document called “Tutorial 8.” A piece for flute and piano appears on the screen. Since you’ll be jumping around quite a bit in this tutorial, you may prefer to work in Scroll View.
- From the View menu, select Scroll View. Scroll to measure 1.
- On Windows, click on the Window menu and choose Advanced Tools Palette.
- Click the Special Tools Tool
 . The Special Tools palette appears as a toolbar on the right side of the screen, containing 18 tool icons, each of which controls some aspect of the music. (This palette is just like the others you’ve encountered: You can hide it or turn it into a floating palette.)
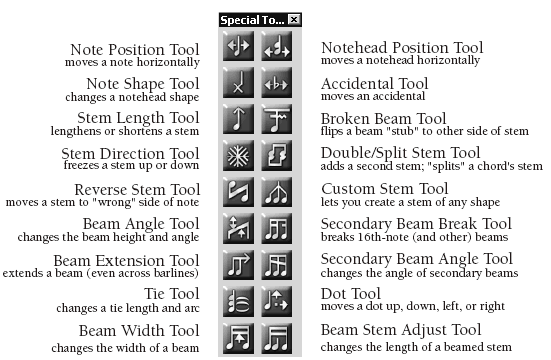
Using the Special Tools tool, you can edit one measure of music at a time. To edit any of the above-listed musical elements, click the appropriate tool on the palette, then click the measure you want to edit. Finale will normally display a small square handle on each note, stem, accidental, beam, tie, or dot (depending on which tool you’re using—to hide these handles, deselect Show Handles in the Special Tools menu). Select the handle or handles of the elements you want to manipulate, and perform the desired action. (You select multiple handles by drag-enclosing or  -clicking.)
For a complete discussion of all Special Tools functions, consult the User Manual under Special Tools. For now, let’s try some experiments.
- Click the Note Position Tool
 , if it’s not already selected.
- Click the first measure of the middle staff.
- Drag any note’s handle left or right. You can move any note, chord, or rest horizontally with this tool, without affecting its playback. Of course, it’s easier to simply drag notes left or right using the Speedy Entry Tool.
- Click the Notehead Position Tool
 . Every notehead in the measure sprouts a handle. (Once you have selected a measure with a Special Tool, Finale assumes you are continuing to work on that measure until you tell it differently. You could click another measure to select it.)
- Drag any handle left or right. Because the Notehead Position Tool lets you move individual noteheads, you could, for example, use it to rearrange the notehead configuration of a cluster chord.
You can also change a notehead’s appearance:
- Click the Note Shape Tool
 , and double-click a note’s handle. The Symbol Selection dialog box appears, containing every possible symbol in the Maestro font. You can double-click any shape in this palette, and it will replace the normal oval notehead of the note you clicked. Using this technique, you can create X noteheads, diamond noteheads, triangle noteheads, or any other special notehead.
- Double-click the X symbol (slot 192). The notehead has been replaced by the X, although it’s obscured by its handle.
- From the Special Tools menu, choose Show Handles to uncheck it. By turning off Show Handles, you make the handles invisible. Now you can see the new notehead. (When Show Handles isn’t selected, you can still use the Special Tools; just click where a handle would be if it were visible.)
- If you want to change noteheads for all notes in a region of your score, choose the Selection Tool, select the region, and from the Utilities menu, choose Change, Noteheads.
Note, by the way, that this technique is best for occasional notehead shape changes. If you plan to create a rhythm part in which most of the noteheads are X’s or slashes, use the Staff Styles feature (see Staff Styles in the User Manual). You can also tell Finale where you want the stem to attach to one of these nonstandard noteheads. See Stem Connections dialog box in the User Manual.
Let’s try some other experiments.
- Choose Show Handles in the Special Tools menu again. The handles reappear.
- Click the Accidental Mover Tool
 . Every accidental in the measure now has a handle. Experiment with dragging these handles—you can slide any accidental horizontally. This would be useful if you wanted to rearrange the accidentals on a cluster chord, for example. To drag the accidental vertically, double-click on the handle. In the Accidental Settings dialog box, check Allow Vertical Positioning. You might use this feature for creating musica ficta, where the accidental appears above the note. Click Cancel to return to the score.
- Click the Stem Length Tool
 . Any note with an unbeamed stem sprouts two handles which you can drag up or down to change the stem’s length. (In this example, the handles below the notes control the stem for the note if it were to be flipped in the opposite direction.) Try lengthening the stem of the second quarter note in the measure. Remember that in order to constrain the cursor to perfectly vertical (or horizontal) movement, press d while dragging.
- The next tool, the Broken Beam Tool
 , is what you use to change the direction of a sixteenth-note (or smaller) beam “stub,” as shown here:

- Click the Stem Direction Tool
 . A handle appears above and below every note in the measure. A click on any handle flips the stem in its direction—and “freezes” the stem that way (hence the snowflake icon), even if the piece gets transposed. Click the handle again to restore the note to “floating” status. (Of course, it’s easier to flip stems with the Simple or Speedy Entry Tool. Position the insertion bar on a note and press the L key to freeze its stem in the opposite direction, or !-L (Mac: b-L) to restore the stem to its “floating” status. Note that the keystroke may be different if you have edited the Simple Entry keyboard shortcuts.)
- Click the Double/Split Stem Tool
 . When you click this tool, a handle appears on every notehead in the measure; another appears above the staff, and another below. Click the lower handle of a note or chord to create double stemming:
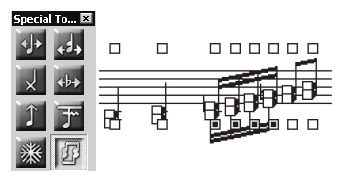
Try it now:
- Click the lower handle of each of the sixteenth notes in the piano part. The new, second stem always points in the opposite direction from the original stem, no matter which handle (top or bottom) you clicked.
The note handles provide an additional feature. They can produce split stemming within a chord, giving the effect of a separate inner voice, like this:
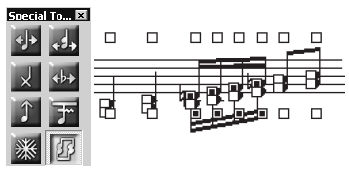
There are two steps to creating this effect: First, click the bottom stem to let Finale know you want to create split stemming. Then click the handle of each note you want to be a part of the upper stem only.
- Click the upper notehead handle of each sixteenth-note chord. Deselect Show Handles (in the Special Tools menu) to hide the handles for a moment. You can see that you’ve made the sixteenth notes appear to be stemmed separately. Select Show Handles again to restore the handles.
You may not use the next two tools as frequently, but it’s a good idea to keep their functions in mind; feel free to experiment as you read. The Reverse Stem Tool F simply flips the stem from one side of its notehead to the other, a function that may be useful in conjunction with cross-staff notes.
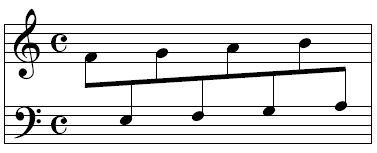
The Custom Stem Tool  provides great flexibility in special beaming cases—for example, splayed beaming, where three mini-stems connect a C flat, C natural, C sharp chord cluster. That’s only one function of the Custom Stem Tool. If you double-click a note’s handle, you’ll enter the Shape Selection dialog box, from which you can select a different shape (or create a new shape with the Shape Designer, covered later in this tutorial) to use as a stem. See Stems in the User Manual for full instructions in the use of these tools.
For a single stemless note, change the stem to a blank shape with the Custom Stem Tool.
- Click the first measure of the top staff, then click the Beam Angle Tool
 . Any notes that are beamed together sprout two handles, one at each end of the beam. The right handle changes the beam angle; as you move it up and down, the left handle remains stationary. The left handle changes the beam height; as you move it up or down, the right handle moves in tandem, and the beam angle doesn’t change.
Try it now: drag the right and left handles of the beam on the pair of eighth notes at the end of the measure.
Five tools provide additional control over beaming. For example, the Secondary Beam Break Tool  lets you specify places where you’d like secondary beams (sixteenths, 32nds, and so on) to break. The Beam Extension Tool
  simply extends any beam past its last note. And there’s also a Secondary Beam Angle Tool
  that lets you give sixteenth-note (and lower) beams different slants. This tool is useful for creating the modern feathered beaming notation of accelerandi and ritards, where several secondary beams converge. The Beam Width Tool
  lets you change the thickness of beams themselves; and the Beam Stem Adjust Tool
  allows you to adjust the length of stems within beamed notes. For a more complete discussion of these tools, see Special Tools in the User Manual.
- Click the second measure of the middle staff.
- Click the Tie Tool
 . Four Handles appear on the tie. You can click and drag these handles to adjust the tie shape manually.
- Double-click the tie’s left handle. The Tie Alterations dialog box appears. This dialog box allows you to change the appearance and placement of individual ties in the score.
The Tie Placement Controls allow you to affect the vertical and horizontal points at which the tie starts and ends. The Tie Control Points offer you control over the shape of the tie. Note that under Tie Direction, Automatic is the default setting. This means that Finale decides which direction the tie should appear based on your settings in the Tie Options dialog box. For more details, see Tie Alterations dialog box in the User Manual.
To flip a tie with the Tie Tool, select the tie’s handle and hit  -F (Mac:
  -F)
-F)
- Click Cancel.
- Click the Dot Tool
 . Double-click the first dotted note’s handle. The Dot Offsets dialog box appears, where you can specify the precise positioning of this dot. (This tool is best for making changes to specific dotted notes. You can set the horizontal dot positioning globally, too; see Dotted Notes in the User Manual.)
The H offset is the horizontal distance between the dot and its default placement (a higher value means farther to the right); the V offset sets the vertical location of the dot relative to its default placement (a higher value means upward); the Inter-Dot Spacing sets the distance between the dots of a note with several dots. For example, if you decide that a dot should be moved down to the next space on the staff, add –.083 (inches) to the V offset. (You can determine which measurement units are used in most Finale text boxes. From the Edit menu, choose Measurement Units.)
- Click Cancel. As you have just seen, the two previous tools have dialog boxes associated with them, in which you can control the positioning of the specified elements very precisely. However, you can also simply drag any handle that appears, as you would with all of the other Special Tools.
If you don’t like what you’ve done, click the handle of the affected element (to select it), and press  or
or  . You can also erase Special Tools modifications on a global basis: Select the desired region with the Selection Tool. From the Edit menu, choose Clear Selected Items. Click Uncheck All. Now specify the Special Tools alterations you want erased, according to the following table:
|
To erase changes made with this tool
|
Select this item in Items to Erase:
|
|
Notehead Position Tool
|
Notehead, Accidental, and Tablature String Alterations
|
|
Note Shape Tool
|
Notehead, Accidental, and Tablature String Alterations
|
|
Accidental Tool
|
Notehead, Accidental, and Tablature String Alterations
|
|
Broken Beam Tool
|
Stem and Beam Alterations
|
|
Stem Length Tool
|
Stem and Beam Alterations
|
|
Custom Stem Tool
|
Stem and Beam Alterations
|
|
Beam Angle Tool
|
Stem and Beam Alterations
|
|
Secondary Beam Break Tool
|
Secondary Beam Breaks
|
|
Beam Extension Tool
|
Beam Extensions
|
|
Secondary Beam Angle Tool
|
Stem and Beam Alterations
|
|
Beam Width Tool
|
Stem and Beam Alterations
|
|
Beam Stem Adjust Tool
|
Stem and Beam Alterations
|
|
Tie Tool
|
Dot and Tie Alterations
|
|
Dot Tool
|
Dot and Tie Alterations
|
You can remove changes you’ve made with the Stem Direction, Double/Split Stem, and Reverse Stem tools using a slightly different method. Select the desired region with the Selection Tool. From the Utilities menu, choose Utilities > Stem Direction > Use Default Direction.
 Previous Previous
|
Next  |


 -clicking.)
 , if it’s not already selected.
 .
. , and double-click a note’s handle.
 .
. .
. ,
,
 .
. .
.


 provides great flexibility in special beaming cases—for example, splayed beaming, where three mini-stems connect a C flat, C natural, C sharp chord cluster. That’s only one function of the Custom Stem Tool. If you double-click a note’s handle, you’ll enter the Shape Selection dialog box, from which you can select a different shape (or create a new shape with the Shape Designer, covered later in this tutorial) to use as a stem. See
  .
. simply extends any beam past its last note. And there’s also a Secondary Beam Angle Tool
  that lets you give sixteenth-note (and lower) beams different slants. This tool is useful for creating the modern feathered beaming notation of accelerandi and ritards, where several secondary beams converge. The Beam Width Tool
  lets you change the thickness of beams themselves; and the Beam Stem Adjust Tool
  allows you to adjust the length of stems within beamed notes. For a more complete discussion of these tools, see
  .
. -F (Mac:
  -F)
-F) .
. or
or  . You can also erase Special Tools modifications on a global basis: Select the desired region with the Selection Tool. From the Edit menu, choose Clear Selected Items. Click Uncheck All. Now specify the Special Tools alterations you want erased, according to the following table: