|
L'aide française est disponible au format PDF en cliquant ici (ou dans le Menu "Démarrer", Finale 2010, Documentation PDF française)
Le tutoriel français est disponible au format PDF en cliquant ici.
La mise à jour de l'aide française au format HTML sera disponible prochainement.
|
Traduction française :

|
Assigning MIDI Channels and Instruments 

Usually, the first step to preparing a score for playback is assigning instruments to staves. If you began your score (or added staves) with the Setup Wizard, instruments have been assigned for you automatically. Even so, you may need to edit the channel, patch, or bank depending on your MIDI output device. For example, setting each staff to its own channel allows you to make changes to each staff individually in real-time using the Mixer or Staff Controls. You can modify the instrument sound, volume, panning, and channel for every staff individually. Furthermore, you can adjust all of these settings for separate layers (voices) within a single staff.
In this section, you’ll learn how to manipulate the channel and instrument for staves using the Instrument List.
- Close any documents you have open, and open the document called “Tutorial 6.” This document is a short arrangement for piano, bass, strings, and harp. (If you are having difficulty seeing all of the staves on your monitor, select a different view percentage from the Scale View to submenu of the View menu.)
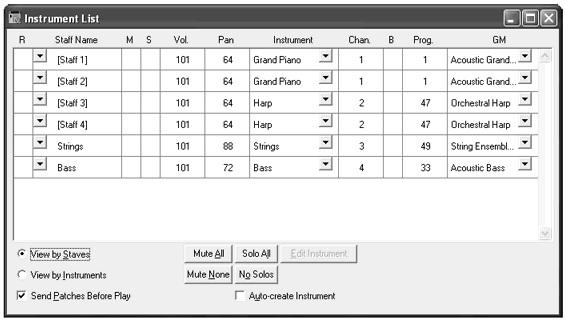
- From the Window menu, choose Instrument List. The Instrument List appears—a staff-by-staff listing of your score. Each staff name has several columns.
- Make sure that the Send Patches Before Play check box, found in the lower-left corner of the Instrument List window, is checked.

An Instrument contains the information needed to access a specific MIDI sound. This includes a name for identification of the Instrument, a channel number to send the information on, and Patch information, consisting of Program change and optional bank change data. An Instrument can be assigned to several staves—if you write a piano part, for example, you’ll certainly want both staves to play over the same MIDI channel and the same piano sound, so you’d designate the two staves using the same Instrument. An Instrument can also be used for just one layer of a staff. If you wrote a flute and a clarinet part both on a single staff, but in different layers, each one could have its own Instrument, and thus have its own MIDI channel and patch assignment.
As you can see from the previous diagram, the Instrument List gives you a convenient way to control which staves play back. Click in the Mute column (M) to mute a staff—or click in the Solo column (S) to isolate a staff (and silence the others).
- From the Instrument drop-down list across from the [Staff 3] staff, choose New Instrument. You’ll need to scroll up to see New Instrument. The Instrument Definition dialog box appears.
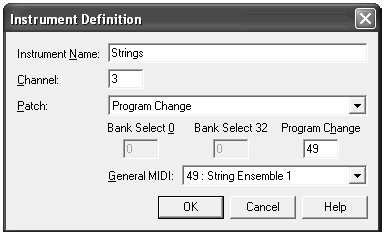
- Name this Instrument “Harp.” Then, type 2 in the Channel text box. You’ll need to set each instrument to a unique channel, so we can send MIDI data to each instrument independently.
- Next to General MIDI, you’ll see “1: Acoustic Grand Piano.” Click on the down arrow and choose “47: Orchestral Harp.” GPO users, note the General MIDI sound selected does not apply to GPO for playback in any way. If you intend to use GPO for playback only (or any non-General MIDI device), this step is not necessary. For further discussion of the Bank Select, Program Change, and General MIDI options, consult the User Manual under Instrument Definition dialog box.
- Click OK. The Instrument List shows the new Instrument name for the first staff.
- From the Instrument drop-down list across from the [Staff 4] staff, choose “Harp.” The same instrument defined for the previous staff also applies to this one.
From the Instrument drop-down list across from the Strings staff, choose New Instrument. Name the Instrument “Strings,” and assign it to Channel 3. From the General MIDI menu, choose “49: String Ensemble 1.” Click OK.

Notice that the Piano and Piano (LH) staves are already assigned to an instrument called “Grand Piano” on channel 1. You can leave these two staves alone. You don't have to create new Instrument names. If you find it easier, you can just edit one of the existing names provided by Finale.
- From the Instrument drop-down list across from the Bass staff, choose Acoustic Bass. Your final setup should look like this:

- If necessary, drag the Instrument List box so that you can see the first measure.
- Windows users, while pressing the Space bar, click the first measure. Macintosh users, just press the spacebar. If Finale’s SmartMusic SoundFont is selected under the MIDI/Audio menu, or your MIDI device is correctly configured, you’ll hear the arrangement performed. Click the score to stop playback (Macintosh: Press the Spacebar again).
Now suppose you decide to play the piano part on a different channel—channel 11, for example. Edit the “Chan.” column for one Piano staff. Since both Piano staves are assigned to the Piano Instrument, Finale changes the channel assignment of both staves to channel 11 automatically. When you do this, the general MIDI instrument will also change for both staves (since there is another instrument definition using channel 11, in this case, Bassoon). Click the drop-down (Macintosh: pop-up) menu under the GM column and choose the Piano sound for one of the piano staves. They will both change to the piano sound. Before moving on, change the Piano staves back to channel 1.
- Close the Instrument List window by clicking its close button. Choose Save from the File menu so that this piece will be ready to play the next time you open it.
 Previous Previous
|
Next  |


