|
L'aide française est disponible au format PDF en cliquant ici (ou dans le Menu "Démarrer", Finale 2010, Documentation PDF française)
Le tutoriel français est disponible au format PDF en cliquant ici.
La mise à jour de l'aide française au format HTML sera disponible prochainement.
|
Traduction française :

|
The Graphics Tool 

In addition to adding text to your document, you may also wish to include a graphic element (a company logo for example) which has been created in a graphics program. Or, in a totally different vein, you may wish to export a Finale-generated musical example into a word processing application. Both the importing and exporting of graphics is performed with the Graphics Tool.
Let’s start by exporting an example of our piece.
- Press the Home key or use the horizontal and vertical scroll bars to navigate the upper left of the page.
- From the View menu, choose Zoom and specify 100%.
- For Windows, click on the Window menu and choose Advanced Tools Palette. Another palette appears docked to the top of the window.
- Select the Graphics tool
 .
.
- Double-click and drag-enclose the pickup measure of Auld Lang Syne: Place the mouse pointer up and to the left of the first measure. Double-click the mouse, keeping the button pressed down after the second click, then drag the mouse down and to the right until a diagonal rectangle has enclosed the pickup measure on the screen: now release the mouse button (the dotted outline should remain on the screen). When you selected the Graphics Tool, a Graphics menu appeared towards the right side of the menu bar at the top of your screen.
- From the Graphics menu, select Export Selection. (Note: if Export Selection is grayed out, you haven't successfully drag-enclosed)
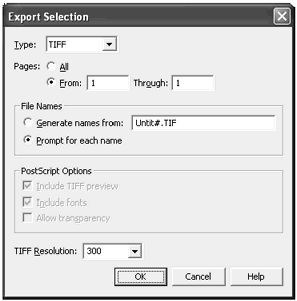
The Export Selection dialog box allows you to determine what graphics file format you wish to export. The decision of which format you choose will be based on what kind of printer you have (an EPS file will work properly ONLY with PostScript printers) as well as what file formats are accepted by the word processing or desktop publishing application you wish to bring the Finale example into.

- Next to Type, choose TIFF from the drop-down list. (This file type will work with any printer and is generally cross-platform.)
- The next item in the dialog box refers to which pages you wish to export. Since we chose Export Selection from the Graphics menu, and not Export pages, this is not applicable to our example, but keep in mind that you could export entire pages without needing to drag-enclose the page.
- Under File Names, select “Prompt for each name” (if it’s not already selected). This instructs Finale to ask us what we’ll want to name our file. You’d choose Generate Names if you wanted Finale to generate a file name automatically.
Postscript Options are only applicable to EPS files, so these items are grayed out because we chose TIFF as our file type.
- Next to Resolution choose 300 from the drop-down list. You typically would want to choose a resolution which matches the resolution of your printer: for example, if you have a 600 dpi printer, you’d want to choose 600. If you're not sure of your printer's resolution, 300 is a good guess. If you choose a resolution higher than your printer’s capabilities, the resulting file will be larger than necessary, and this could cause complications when printing. A resolution less than that of your printer’s capabilities will simply result in a more jagged printout. Note that this option is not available if you chose EPS as your file type.
- Click OK. The Save TIFF dialog box will appear, allowing you to name your file and determine where it will be located.
You’ll want to remember where you’ve saved this file for future reference.
- Make sure your Finale 2010 folder is specified. For the purpose of this tutorial, we will use the default Finale directory; if you have changed this folder name (or are using a different version of Finale) please replace references to Finale 2010 throughout this tutorial with the name of your Finale folder.
- Enter “tut4picture” in the File Name field, and click Save. This file can now be imported into any desktop publishing or word processing application. You will want to look in your specific desktop publishing or word processing manual for the exact steps for importing a graphic: typically this is referred to by the terms Place or Insert.
- Now that you’ve created a TIFF file, we’ll import the same file back into Finale. While importing Finale examples into Finale is not necessarily something you’d commonly do, the procedure would be the same if you were importing any other type of graphic like a company logo or letterhead.
- Click anywhere on the screen to remove your previous selection.
- From the Graphics menu, choose Place Graphic. (you could also double-click on the document window—in Page View—where you'd like the graphic to appear).
The Place Graphic dialog box is where you specify the graphic item you wish to import: in this tutorial we'll use the file you saved moments ago.
If your Finale 2010 folder is not already chosen, select it now.
- Click on tut4picture once to select it, then click the Open button. At the bottom, for File Type, be sure .TIF is selected.
Since you chose Place Graphic rather than double-clicking where you wanted the graphic to appear, Finale is awaiting instruction for placement of the graphic.
- Place the cursor where you want the upper left-hand corner of the graphic to appear and click the mouse. Your graphic will appear. You can click on the graphic to drag it elsewhere or drag one of the handles to scale it horizontally or vertically.
For more information, see the Graphics Tool in the User Manual.
 Previous Previous
|
Next  |


