|
L'aide française est disponible au format PDF en cliquant ici (ou dans le Menu "Démarrer", Finale 2010, Documentation PDF française)
Le tutoriel français est disponible au format PDF en cliquant ici.
La mise à jour de l'aide française au format HTML sera disponible prochainement.
|
Traduction française :

|
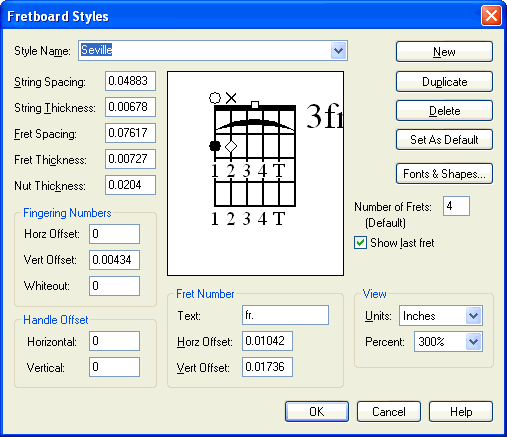
Fretboard Styles dialog box

How to get there
Click the Chord Tool  , choose Manual Input from the Chord menu, then click any note that doesn’t have a chord symbol attached. In the Chord Definition dialog box, click the Edit Styles button.
If a note has a chord symbol attached, click the note to make the chord’s handle appear. Double-click the handle, then click the Edit Styles button.
What it does
In this dialog box you can fine-tune how Finale draws certain aspects of fretboard diagrams, such as how far apart to draw the strings or how much of the string to whiteout around numbers.
- Name. The name of the style you’re editing.
- String Spacing. Enter the distance between strings on custom fretboards.
- String Thickness. Enter how wide to draw the strings on custom fretboards.
- Fret Spacing. Enter the distance between frets on custom fretboards.
- Whiteout. Enter the vertical whiteout area to draw above and below 1, 2,3,4, & T on custom fretboards.
- Nut Thickness. Enter the thickness of the nut line drawn at the top of custom fretboards.
- Show Last Fret. Check this box to show the bottom fret line. Uncheck it to hide the last fret.
- Fret Number: Text • Horz Offset • Vert Offset. Enter the text you wish to appear next to the fret number. Use the Offset values to adjust the position of fret number text and fret number.
- Handle Offset: Horizontal • Vertical. Use these values to adjust the position of the fretboard handle relative to the fretboard in the score.
- View: Units • Percent. Select a measurement unit from the drop-down list to see all values in the dialog box displayed in that unit. Select a view percentage from the drop-down list to change the display of the fretboard example.
- Fonts & Shapes. Click this button to select the fonts for the fret number and fingering text as well as the shapes of barres and other symbols. See Fretboard Style Fonts & Shapes dialog box.
- Number of Frets (Default). Enter the default number of frets to use when creating custom fretboards.
- New • Duplicate • Delete • Set As Default. Click New to create a new Fretboard Style. Click Duplicate to make a copy of the current Fretboard Style to edit. Click Delete to remove the current Fretboard Style. Click Set As Default to set the fretboard style to be used as the default.
- OK • Cancel. Click OK to confirm the settings and return to the Chord Definition dialog box. Click Cancel to return to the Chord Definition dialog box without modifying the settings.
See Also:
Chord Definition
Fretboard Editor


