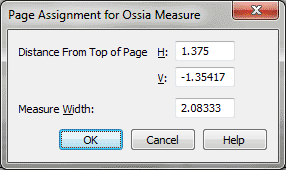
Page Assignment for Ossia Measure dialog box

How to get there
You can access the Page Assignment for Ossia Measure in two ways, depending on whether you are adding a new Ossia measure or editing on that already exists in your score:
- Choose Window > Advanced Tools. Click the Ossia tool
 .
.
- In Page View double-click the location on the page to
which you want to attach the "floating measure."
- The Ossia Designer
dialog box appears; click OK.
To edit an existing Ossia measure:
- SHIFT+double-click its handle (Page View only).
What it does
There are two distinctly different kinds
of "ossia" measures. One kind of floating measure, called measure-assigned
Ossia has a position that remains fixed relative to the measure to which
it is attached. The other, called page-assigned Ossia, can be created
only in Page View, and is attached permanently to a particular spot on
the page, where it will remain even if the "real" music around
it changes position. In this dialog box, you specify a page-assigned floating
measure’s precise positioning in relation to the page to which it’s attached.
- Distance
from Top of Page: H: • V:. The numbers in these text boxes determine
the precise position of the floating measure in relation to the margins
of the page to which it’s attached. A positive H: (horizontal) number
moves the measure to the right; a positive V: (vertical) number moves
the measure upward. (Keep in mind, however, that you can also move the
floating measure into position in the score by dragging its handle.) If
H: and V: were both zero, the floating measure would be squarely superimposed
on the intersection of the top and left page margins.
- Measure
Width. The number in this text box determines the horizontal width
of the floating measure. (The Left and Right Offset values are measured
in relation to this master width measurement.)
- OK
• Cancel. Click OK to confirm, or Cancel to discard, the settings
you’ve made in this dialog box. You return to the score.
See Also:
Ossia Measure Designer
Ossia tool

