|
L'aide française est disponible au format PDF en cliquant ici (ou dans le Menu "Démarrer", Finale 2010, Documentation PDF française)
Le tutoriel français est disponible au format PDF en cliquant ici.
La mise à jour de l'aide française au format HTML sera disponible prochainement.
|
Traduction française :

|
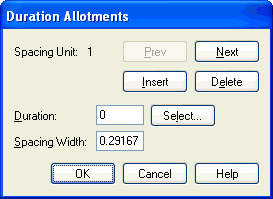
Duration Allotments dialog box

How to get there
From the Document menu, choose Document Options, then select Music Spacing. Click Spacing Widths. Then click Widths.
What it does
By spacing your music with the aid of a Spacing Library, you can create extremely professional-looking scores, in which measures are neither wider nor narrower than they need to be.
There are several spacing libraries provided with Finale: Fibonacci, Loose, Medium, Tight, etc. After you’ve loaded one of these libraries into the document (by choosing Load Library from the File menu), you apply its spacing to your music by selecting the desired region and using the Music Spacing command in the Utilities menu. You can also edit or create your own Spacing Table using this dialog box.
- Spacing Widths (#). A Spacing Width Table is constructed by assigning a horizontal space measurement to each rhythmic value—from sixty-fourth note to double whole note. The Spacing Width indicator tells you which of such duration/width pairings you’re viewing. (Click the Prev and Next buttons to cycle through the pairings.)| end
- Duration. The number in this text box, measured in (1024 per quarter note), identifies the durational value whose width allotment you’re viewing. If you want to create a new duration/width pairing—for a tuplet that has no specified allotment, for example—you must first calculate the duration, as expressed in EDUs, and enter it in this box. (For example, the EDU value for a quintuplet eighth note is 205, because it’s one-fifth of a quarter note, whose duration is 1024). Then you enter a width allotment in the Allotment box, and click Insert.
Instead of calculating the EDU equivalent, however, you can also click Duration to display a visual palette of rhythmic values. Click the desired value (and the dot, if it’s a dotted value) and click OK; Finale returns to the Duration Allotment box and fills in the EDU equivalent in the Duration box for you. (If, when viewing a duration/width pairing whose EDU number isn’t evenly divisible into a quarter note—a quintuplet value, for example—the duration palette will display the closest possible value.)
- Spacing Width. The number you enter in this text box specifies the horizontal width to be allotted to any note of the displayed rhythmic value (Duration box). (As usual, the units of measurement are whatever you’ve selected using the Measurement Units submenu of the Edit menu.) If you notice that a certain Spacing Table isn’t allotting enough space for your sixteenth notes, for example, increase the Spacing Width value of the sixteenth note (Duration value: 256) and use the Music Spacing command again. You should notice that Finale is now giving more space to every sixteenth note in the selected region (if you made a large enough increase in its Spacing Width value).
- Insert. If you need to create a new duration/width pairing, enter new numbers into the Duration and Spacing Width boxes, as explained above. (Don’t worry about typing over existing values; Finale will remember the values you’re replacing.) Then click Insert to save your new pairing into this Spacing Table.
- Delete. Click Delete to remove a duration/width pairing from the table.
- Prev • Next. Click Prev or Next to move backward or forward through the displays of duration/width pairings.
- OK. Click OK to save any changes you’ve made to the Spacing Table and return to the Document Options-Music Spacing dialog box. If you then click OK again, your modified spacing widths are applied to the selected measures. If you’ve made substantial changes, you may want to save the complete edited library into a separate file of its own (a spacing library on your disk with its own icon), so that you can load it later into other pieces. If so, choose Save from the Library submenu of the File menu, click Music Spacing, click OK, give your customized library a title, and click Save. See also Save Library dialog box.
- Cancel. Click Cancel to discard the last change you’ve made to the Spacing Table and return to the Document Options-Music Spacing dialog box.
See Also:
Music spacing
Music spacing dialog box
Utilities menu
Document Options-Music Spacing dialog box


