|
L'aide française est disponible au format PDF en cliquant ici (ou dans le Menu "Démarrer", Finale 2010, Documentation PDF française)
Le tutoriel français est disponible au format PDF en cliquant ici.
La mise à jour de l'aide française au format HTML sera disponible prochainement.
|
Traduction française :

|
To design an articulation
Follow these steps to add a new symbol to the Articulation Selection dialog box.
- Click the Articulation Tool
 , and click a note in the score. It makes no difference what note you click; the symbol you’re about to design won’t appear in the score until you want it to. The Articulation Selection dialog box appears.
- Click Create. The Articulation Designer dialog box appears. If the symbol you want to create is not a musical symbol in the Maestro music font, click Set Font to specify a different font.
- Next to the Main Symbol display, click Main. The Symbol Selection dialog box appears. Use the scroll bars to view all the musical symbols available in the font.
- Double-click the marking you want. You return to the Articulation Designer dialog box.
- Describe how you want this marking to appear, using the Positioning Options.
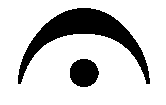
How you use these options depends upon the type of music you’re notating, and your own preferences. If you make these settings carefully, you’ll save an immense amount of time when you place articulations into your scores, because Finale’s articulations don’t merely snap into place on a note—when a note’s stem direction changes, its marking even flips to the other side, and, as in the case of a fermata  , even turns upside down automatically.
Note: As you read about the following options, remember that all of these placement options have already been established for the basic set of articulation markings included in your Finale package. You can safely skip this entire section, unless you want to learn to edit these settings (or create new articulations of your own.
In some jazz and popular music, it’s standard practice to place certain markings consistently above the staff, regardless of stem direction. If that’s the case, choose Above note from the Position drop-down list.
In other music, you may decide that a symbol should appear either above or below the note, depending on the note’s stem direction. In that case, choose either On note side or On stem side from the Position drop-down list.Finally, you’ll find some additional placement options in the form of checkboxes. Click Avoid Staff Lines if you don’t want Finale to place a symbol so that it falls on a staff line. (Since symbols are different sizes, Finale will attempt to place the symbol’s handle so that it doesn’t fall on a staff line. This may mean, however, that the handle of a marking is between lines, but part of the symbol itself crosses a line. In that case, click the Handle Positioning button, and use the H: and V: controls to further adjust the symbol’s positioning within the staff lines.) Click Always Place Outside Staff if you want Finale to place this marking as close as possible to a note, but never within the staff. Finale can accommodate either notational convention: With Always place Outside unchecked, articulations are placed a certain distance from the notehead whether or not they’re inside or outside the staff. With Always Place outside checked articulations are placed as close as possible to their noteheads without appearing within the staff lines.Click Center Horizontally if Finale should neatly center the articulation with the notehead automatically. Finally, click Attach to Top Note if, when you attach this marking to a chord, you want Finale to measure the marking’s distance from the top note instead of the bottom one.
- If this marking is supposed to flip "upside down" when the stem direction changes, click the Flipped button and select the flipped character. Some symbols, such as
 are supposed to appear inverted when below a note. Finale can’t turn a symbol upside down; instead, Maestro and other music fonts contain both the normal and inverted versions of each such symbol. When a note’s stem direction changes, Finale can substitute the appropriate "upside-down" symbol automatically.
- Find the drop-down list that begins, "When Placed Below a Note, use the…", and choose Flipped Symbol. See Finale Libraries in the Appendix for the settings for typical markings.
- Define the marking for playback, if you wish. Your marking can affect key velocity (i.e., volume—an accent, for example) or timing (a staccato mark, for example). See To define an articulation for playback.
- Click OK (or press enter). From now on, you may click as sloppily as you wish when attaching this marking to a note; Finale will neatly center it, place it on the correct side of the note, and substitute an inverted symbol when necessary—if you’ve set the marking up that way. Once you’ve placed an articulation on a note, of course, you’re still free to drag it to a new position.


