Score System
Divider Plug-in

How to get there
Choose Plug-ins > Scoring and
Arranging > System Divider.
What it does
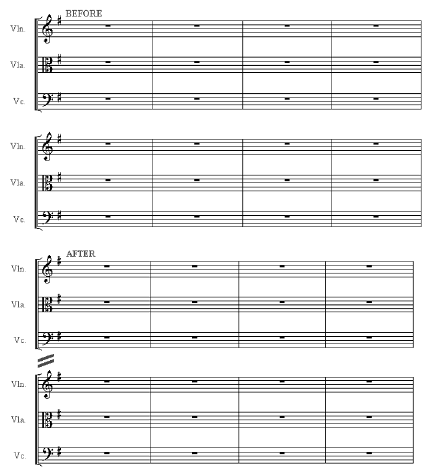
Automatically inserts or removes system
separation marks between staff systems on the same page in a completed
score as shown below. This plug-in should be run after the score layout
has been finalized. Also, lock systems (see Utilities/Lock
Systems) to ensure measures are not redistributed among the pages.
The system separation marks are added as page attached text blocks. The
symbol used is character 187 in Finale’s EngraverFontSet font.
Note. Make sure that
your score is fully updated before running this plug-in. Otherwise, you
may experience undesirable placement of the divider symbols. After running
this plug-in, if you are not satisfied with the results, from the Edit
menu, choose Undo to remove them.

- Page Range:
All · Current · Selected. Here, select the pages to which you would like
to add system separation marks. Choose All for all pages, Current for
the page currently visible in the Finale window or Selected to specify
a page range using the drop-down menus below.
- Vertical:
Between last/first staff lines · Between staff system boundaries · Adjustment.
These settings control the vertical placement of system separation marks.
Choose Between last/first staff lines to instruct Finale to add system
separation marks at the midpoint between the bottom staff line in one
system and the top staff line in the next. Choose Between staff system
boundaries to add system separation marks at the midpoint between the
bottom system margin of one system and the top system margin of the next
(as displayed when the Page Layout tool is selected). To offset the system
separation marks from this placement setting vertically specify a positive
or negative value in the Adjustment field to move the marks up or down
respectively. The units of measurement are whatever you’ve selected using
the Measurement Units command under the Edit menu.
- Horizontal:
Left Side · Right Side · Adjustment. These settings control the
appearance and horizontal placement of system separation marks. Check
Left side to include separation marks on the left side of the page. Check
Right side to include separation marks on the right side of the page.
Specify a positive or negative value in the Adjustment field beneath these
options to move the marks left or right respectively. The units of measurement
are whatever you’ve selected using the Measurement Units command under
the Edit menu.
- Font
size. Choose an option from this menu to specify the font size
for the system separation marks.
- Remove.
Click remove to delete system separation marks you have added with this
plug-in. Note that you will not be able to automatically remove system
separation marks that have been edited manually. Therefore it is recommended
that you do not edit the system separation marks added with this plug-in
manually. Remember, if you have just run this plug-in, and are not satisfied
with the results, you can choose Undo from the Edit menu (or press CTRL+Z)
to remove them.
- OK
· Cancel · Info. Click OK to add system separation marks. Click
Cancel to dismiss the dialog box without making any changes. Click Info
for more information regarding the JW collection of plug-ins.


